这篇文章介绍了我是如何使用 Vue 渲染函数 为设计系统构建排版网格的。这是 演示 和 代码。我使用渲染函数是因为它们允许您以比常规 Vue 模板更高的控制级别创建 HTML,但令人惊讶的是,当我在网上搜索渲染函数的实际应用(而非教程)时,并没有找到太多相关的资料。我希望这篇文章能够填补这一空白,并提供一个关于使用 Vue 渲染函数的有用且实用的案例。
我一直觉得渲染函数在 Vue 中有点格格不入。虽然框架的其余部分强调简洁性和关注点分离,但渲染函数却是一种奇怪且难以阅读的 HTML 和 JavaScript 混合体。
例如,要显示
<div class="container">
  <p class="my-awesome-class">Some cool text</p>
</div>
…您需要
render(createElement) {
  return createElement("div", { class: "container" }, [
    createElement("p", { class: "my-awesome-class" }, "Some cool text")
  ])
}
我怀疑这种语法让一些人望而却步,因为易用性是人们首先选择 Vue 的关键原因。这很可惜,因为渲染函数和函数式组件能够实现一些非常酷、强大的功能。为了证明它们的价值,以下是如何帮助我解决实际业务问题的。
**快速免责声明:**在阅读本文的过程中,最好在另一个标签页中打开 演示 以供参考。
定义设计系统的标准
我的团队希望在我们的 VuePress 驱动的设计系统中包含一个页面,用于展示不同的排版选项。这是我从设计师那里获得的模型的一部分。

以下是一些相应的 CSS 示例
h1, h2, h3, h4, h5, h6 {
  font-family: "balboa", sans-serif;
  font-weight: 300;
  margin: 0;
}

h4 {
  font-size: calc(1rem - 2px);
}

.body-text {
  font-family: "proxima-nova", sans-serif;
}

.body-text--lg {
  font-size: calc(1rem + 4px);
}

.body-text--md {
  font-size: 1rem;
}

.body-text--bold {
  font-weight: 700;
}

.body-text--semibold {
  font-weight: 600;
}
标题使用标签名称进行定位。其他项目使用类名,并且有单独的类用于字体粗细和大小。
在编写任何代码之前,我创建了一些基本规则
- 由于这实际上是一个数据可视化,因此数据应存储在单独的文件中。
- 标题应使用语义标题标签(例如
<h1>、<h2>等),而不是依赖于类。 - 正文内容应使用段落 (
<p>) 标签,并带有类名(例如<p class="body-text--lg">)。 - 具有变体的內容类型应通过将其包装在根段落标签或相应的根元素中进行分组,且无需样式类。子元素应使用
<span>和类名进行包装。
<p>
  <span class="body-text--lg">Thing 1</span>
  <span class="body-text--lg">Thing 2</span>
</p>- 任何不演示特殊样式的内容都应使用带有正确类名的段落标签,并使用
<span>作为任何子节点。
<p class="body-text--semibold">
  <span>Thing 1</span>
  <span>Thing 2</span>
</p>- 每个演示样式的单元格的类名只需要编写一次。
为什么渲染函数有意义
在开始之前,我考虑了一些选项
硬编码
我喜欢在适当的时候使用硬编码,但是手动编写 HTML 将意味着键入不同的标记组合,这似乎很麻烦且重复。它还意味着数据无法保存在单独的文件中,因此我排除了这种方法。
我的意思是
<div class="row">
  <h1>Heading 1</h1>
  <p class="body-text body-text--md body-text--semibold">h1</p>
  <p class="body-text body-text--md body-text--semibold">Balboa Light, 30px</p>
  <p class="group body-text body-text--md body-text--semibold">
    <span>Product title (once on a page)</span>
    <span>Illustration headline</span>
  </p>
</div>
使用传统的 Vue 模板
这通常是首选方法。但是,请考虑以下情况
查看 Salomone Baquis (@soluhmin) 在 CodePen 上的笔
不同样式示例。
在 CodePen 上。
在第一列中,我们有
– 一个按原样呈现的 <h1> 标签。
– 一个 <p> 标签,它将一些带有文本的 <span> 子元素组合在一起,每个子元素都有一个类(但 <p> 标签上没有特殊类)。
– 一个带有类且没有子元素的 <p> 标签。
结果将意味着许多 v-if 和 v-if-else 的实例,我知道这很快就会变得混乱。我也不喜欢标记中所有这些条件逻辑。
由于这些原因,我选择了渲染函数。渲染函数使用 JavaScript 根据所有已定义的标准有条件地创建子节点,这似乎非常适合这种情况。
数据模型
如前所述,我想将排版数据保存在一个单独的 JSON 文件中,以便以后可以轻松地进行更改,而无需修改标记。这是 原始数据。
文件中的每个对象都表示不同的行。
{
  "text": "Heading 1",
  "element": "h1", // Root wrapping element.
  "properties": "Balboa Light, 30px", // Third column text.
  "usage": ["Product title (once on a page)", "Illustration headline"] // Fourth column text. Each item is a child node.
}
上面的对象呈现以下 HTML
<div class="row">
  <h1>Heading 1</h1>
  <p class="body-text body-text--md body-text--semibold">h1</p>
  <p class="body-text body-text--md body-text--semibold">Balboa Light, 30px</p>
  <p class="group body-text body-text--md body-text--semibold">
    <span>Product title (once on a page)</span>
    <span>Illustration headline</span>
  </p>
</div>让我们看一个更复杂的例子。数组表示子元素的组。classes 对象可以存储类。base 属性包含每个单元格分组中每个节点共有的类。variants 中的每个类都应用于分组中的不同项目。
{
  "text": "Body Text - Large",
  "element": "p",
  "classes": {
    "base": "body-text body-text--lg", // Applied to every child node
    "variants": ["body-text--bold", "body-text--regular"] // Looped through, one class applied to each example. Each item in the array is its own node.
  },
  "properties": "Proxima Nova Bold and Regular, 20px",
  "usage": ["Large button title", "Form label", "Large modal text"]
}
以下是其呈现方式
<div class="row">
  <!-- Column 1 -->
  <p class="group">
    <span class="body-text body-text--lg body-text--bold">Body Text - Large</span>
    <span class="body-text body-text--lg body-text--regular">Body Text - Large</span>
  </p>
  <!-- Column 2 -->
  <p class="group body-text body-text--md body-text--semibold">
    <span>body-text body-text--lg body-text--bold</span>
    <span>body-text body-text--lg body-text--regular</span>
  </p>
  <!-- Column 3 -->
  <p class="body-text body-text--md body-text--semibold">Proxima Nova Bold and Regular, 20px</p>
  <!-- Column 4 -->
  <p class="group body-text body-text--md body-text--semibold">
    <span>Large button title</span>
    <span>Form label</span>
    <span>Large modal text</span>
  </p>
</div>
基本设置
我们有一个父组件 TypographyTable.vue,它包含包装表格元素的标记,以及一个子组件 TypographyRow.vue,它创建一个行并包含我们的渲染函数。
我遍历行组件,并将行数据作为 props 传递。
<template>
  <section>
    <!-- Headers hardcoded for simplicity -->
    <div class="row">
      <p class="body-text body-text--lg-bold heading">Hierarchy</p>
      <p class="body-text body-text--lg-bold heading">Element/Class</p>
      <p class="body-text body-text--lg-bold heading">Properties</p>
      <p class="body-text body-text--lg-bold heading">Usage</p>
    </div>
    <!-- Loop and pass our data as props to each row -->
    <typography-row
      v-for="(rowData, index) in $options.typographyData"
      :key="index"
      :row-data="rowData"
    />
  </section>
</template>
<script>
import TypographyData from "@/data/typography.json";
import TypographyRow from "./TypographyRow";
export default {
  // Our data is static so we don't need to make it reactive
  typographyData: TypographyData,
  name: "TypographyTable",
  components: {
    TypographyRow
  }
};
</script>
需要指出的一件巧妙的事情是:排版数据可以是 Vue 实例上的一个属性,并使用 $options.typographyData 进行访问,因为它不会更改并且不需要是响应式的。(感谢 Anton Kosykh 的提示)。
创建函数式组件
传递数据的 TypographyRow 组件是一个函数式组件。函数式组件 是无状态且无实例的,这意味着它们没有 this 并且无法访问任何 Vue 生命周期方法。
空的起始组件如下所示
// No <template>
<script>
export default {
  name: "TypographyRow",
  functional: true, // This property makes the component functional
  props: {
    rowData: { // A prop with row data
      type: Object
    }
  },
  render(createElement, { props }) {
    // Markup gets rendered here
  }
}
</script>
render 方法接受一个 context 参数,该参数具有一个 props 属性,该属性被解构并用作第二个参数。
第一个参数是 createElement,它是一个告诉 Vue 创建哪些节点的函数。为简洁起见,我将 createElement 缩写为 h。您可以在 Sarah 的文章 中了解我这样做的原因。
h 接受三个参数
- HTML 标签(例如
div) - 带有模板属性的数据对象(例如
{ class: 'something'}) - 文本字符串(如果我们只是添加文本)或使用
h构建的子节点
render(h, { props }) {
  return h("div", { class: "example-class" }, "Here's my example text")
}
好的,所以回顾一下我们目前所处的位置,我们已经介绍了创建
- 一个包含将在我的可视化中使用的数据的文件;
- 一个我正在导入完整数据文件的常规 Vue 组件;以及
- 一个将显示每一行的函数式组件的开头。
要创建每一行,需要将来自 JSON 文件的数据传递到 h 的参数中。这可以一次性完成,但这涉及大量的条件逻辑,并且会让人感到困惑。
相反,我决定将其分为两个部分
- 将数据转换为可预测的格式。
- 渲染转换后的数据。
转换通用数据
我希望我的数据格式与 h 的参数匹配,但在执行此操作之前,我写下了我想要如何构建数据结构
// One cell
{
  tag: "", // HTML tag of current level
  cellClass: "", // Class of current level, null if no class exists for that level
  text: "", // Text to be displayed
  children: [] // Children each follow this data model, empty array if no child nodes
}
每个对象代表一个单元格,四个单元格组成一行(一个数组)。
// One row
[ { cell1 }, { cell2 }, { cell3 }, { cell4 } ]
入口点将是一个类似于以下的函数
function createRow(data) { // Pass in the full row data and construct each cell
  let { text, element, classes = null, properties, usage } = data;
  let row = [];
  row[0] = createCellData(data) // Transform our data using some shared function
  row[1] = createCellData(data)
  row[2] = createCellData(data)
  row[3] = createCellData(data)

  return row;
}
让我们再看看我们的模型。
第一列具有样式变化,但其余部分似乎遵循相同的模式,所以让我们从这些开始。
同样,每个单元格的理想模型是
{
  tag: "",
  cellClass: "",
  text: "",
  children: []
}
这使得每个单元格都具有树状结构,因为某些单元格包含一组子单元格。让我们使用两个函数来创建单元格。
createNode函数将我们需要的每个属性作为参数。createCell函数封装了createNode,以便我们可以检查传递的文本是否为数组。如果是,我们将构建一个子节点数组。
// Model for each cell
function createCellData(tag, text) {
  let children;
  // Base classes that get applied to every root cell tag
  const nodeClass = "body-text body-text--md body-text--semibold";
  // If the text that we're passing in as an array, create child elements that are wrapped in spans.
  if (Array.isArray(text)) {
    children = text.map(child => createNode("span", null, child, children));
  }
  return createNode(tag, nodeClass, text, children);
}
// Model for each node
function createNode(tag, nodeClass, text, children = []) {
  return {
    tag: tag,
    cellClass: nodeClass,
    text: children.length ? null : text,
    children: children
  };
}
现在,我们可以执行以下操作:
function createRow(data) {
  let { text, element, classes = null, properties, usage } = data;
  let row = [];
  row[0] = ""
  row[1] = createCellData("p", ?????) // Need to pass in class names as text
  row[2] = createCellData("p", properties) // Third column
  row[3] = createCellData("p", usage) // Fourth column

  return row;
}
我们将 properties 和 usage 作为文本参数传递到第三列和第四列。但是,第二列略有不同;在那里,我们显示类名,它们存储在数据文件中,如下所示:
"classes": {
  "base": "body-text body-text--lg",
  "variants": ["body-text--bold", "body-text--regular"]
},
此外,请记住标题 *没有* 类,因此我们希望为这些行显示标题标签名称(例如 h1、h2 等)。
让我们创建一些辅助函数,将这些数据解析为我们可以用于文本参数的格式。
// Pass in the base tag and class names as arguments
function displayClasses(element, classes) {
  // If there are no classes, return the base tag (appropriate for headings)
  return getClasses(classes) ? getClasses(classes) : element;
}

// Return the node class as a string (if there's one class), an array (if there are multiple classes), or null (if there are none.)
// Ex. "body-text body-text--sm" or ["body-text body-text--sm body-text--bold", "body-text body-text--sm body-text--italic"]
function getClasses(classes) {
  if (classes) {
    const { base, variants = null } = classes;
    if (variants) {
      // Concatenate each variant with the base classes
      return variants.map(variant => base.concat(`${variant}`));
    }
    return base;
  }
  return classes;
}
现在我们可以这样做:
function createRow(data) {
  let { text, element, classes = null, properties, usage } = data;
  let row = [];
  row[0] = ""
  row[1] = createCellData("p", displayClasses(element, classes)) // Second column
  row[2] = createCellData("p", properties) // Third column
  row[3] = createCellData("p", usage) // Fourth column

  return row;
}
转换演示数据
这留下了第一列,用于演示样式。这一列与众不同,因为我们为每个单元格应用了新的标签和类,而不是使用其他列使用的类组合。
<p class="body-text body-text--md body-text--semibold">与其尝试在 createCellData 或 createNodeData 中执行此操作,不如让我们创建另一个函数,置于这些基本转换函数之上,并处理一些新的逻辑。
function createDemoCellData(data) {
  let children;
  const classes = getClasses(data.classes);
  // In cases where we're showing off multiple classes, we need to create children and apply each class to each child.
  if (Array.isArray(classes)) {
    children = classes.map(child =>
      // We can use "data.text" since each node in a cell grouping has the same text
      createNode("span", child, data.text, children)
    );
  }
  // Handle cases where we only have one class
  if (typeof classes === "string") {
    return createNode("p", classes, data.text, children);
  }
  // Handle cases where we have no classes (ie. headings)
  return createNode(data.element, null, data.text, children);
}
现在,我们已将行数据规范化为可以传递给渲染函数的格式。
function createRow(data) {
  let { text, element, classes = null, properties, usage } = data
  let row = []
  row[0] = createDemoCellData(data)
  row[1] = createCellData("p", displayClasses(element, classes))
  row[2] = createCellData("p", properties)
  row[3] = createCellData("p", usage)

  return row
}
渲染数据
以下是我们实际渲染数据以显示的方式。
// Access our data in the "props" object
const rowData = props.rowData;

// Pass it into our entry transformation function
const row = createRow(rowData);

// Create a root "div" node and handle each cell
return h("div", { class: "row" }, row.map(cell => renderCells(cell)));

// Traverse cell values
function renderCells(data) {

  // Handle cells with multiple child nodes
  if (data.children.length) {
    return renderCell(
      data.tag, // Use the base cell tag
      { // Attributes in here
        class: {
          group: true, // Add a class of "group" since there are multiple nodes
          [data.cellClass]: data.cellClass // If the cell class isn't null, apply it to the node
        }
      },
      // The node content
      data.children.map(child => {
        return renderCell(
          child.tag,
          { class: child.cellClass },
          child.text
        );
      })
    );
  }

  // If there are no children, render the base cell
  return renderCell(data.tag, { class: data.cellClass }, data.text);
}

// A wrapper function around "h" to improve readability
function renderCell(tag, classArgs, text) {
  return h(tag, classArgs, text);
}总结
值得指出的是,这种方法代表了一种解决相对简单问题的实验性方法。我相信很多人会争辩说,这种解决方案不必要地复杂且过度设计。我可能也会同意。
然而,尽管前期成本较高,但数据现在已完全与呈现分离。现在,如果我的设计团队添加或删除行,我不必深入到 混乱的 HTML 中——我只需更新 JSON 文件中的几个属性即可。
值得吗?就像编程中的其他所有事物一样,我想 这取决于具体情况。我必须说,在我处理这个问题时,我一直都在想着这个漫画。
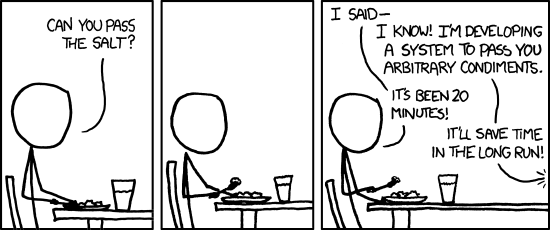
也许这就是答案。我很乐意听取您所有(建设性的)想法和建议,或者如果您尝试过其他解决类似任务的方法。
很棒的文章 - 我一直想知道为什么要使用渲染函数,但这篇文章解释得非常好。
顺便说一句,有一个错别字 - 类中缺少一个
"。谢谢!这个问题已修复。
好文章!我认为您用“值得吗?就像编程中的其他所有事物一样,我想这取决于具体情况”这句话很好地总结了问题。
不错的 数据处理。
我现在避免使用渲染函数的主要原因是,Vue 3 中的语法将会发生变化。
很棒的文章。
作为替代方案,您可以使用
v-if、v-for和<component :is="element">相对轻松地实现它。它可能没有那么“简洁”,但请查看:https://codepen.io/anon/pen/Ybmozp干得好!我绝对认为这种方法有其优势(它肯定不那么冗长)。
正如我在文章中指出的那样,我最初避免这样做,因为我发现这种紧密的标记/逻辑耦合会让人感到困惑,尤其是在需求发生变化时。我在一个生产应用程序上工作,人们试图将各种条件语句都放在 HTML 内部,结果很快就变得一团糟。
JS/函数式方法可能需要同样程度的维护,但我个人更喜欢将事物分开(这可能也解释了为什么我从未爱上 React)。
感谢您整理这些内容!很高兴看到另一种实现方式。